Searching for the best solution for how to embed Google Reviews in WordPress?
If you have a local business, adding Google Reviews to your website is a great way to boost trust with your visitors and send strong local SEO signals to Google and other search engines.
However, Google doesn’t give you an easy way to embed real reviews in your website, so you might not be sure where to start when it comes to adding those reviews to your WordPress site.
While you could just copy and paste reviews from Google to your website, that eliminates some of the trust benefits because there’s nothing linking that text to a real review. It also doesn’t let you automatically pull in new reviews to your site as they come in.
Thankfully, there are some great Google Reviews WordPress plugins that you can use to add Google Reviews to WordPress. And in this post, you’re going to learn exactly how three of the most popular options work.
Best of all – all three plugins have a free version that you can use to follow the tutorial.
What You Need to Add Google Reviews to WordPress
To embed Google Reviews in WordPress, you’re going to need a few things:
- Google Business Profile listing (if you don’t have one already)
- Google Reviews WordPress plugin
- Google Places API key (depending on the plugin)
Here are the different requirements in more detail…
Google Business Profile Listing
First, you’ll probably want a Google Business Profile listing where customers can leave reviews in the first place.
While you can embed Google Reviews from any listing (even those you don’t control), setting up your own Google Business Profile listing will give you more control over your business’s profile in Google.
Because this profile is where customers will leave the reviews that you embed, you’ll want to put your best foot forward. By creating your profile, you’ll be able to add pictures, edit business details, share updates, and more.
To create your listing, you can go to the Google Business Profile page and follow the instructions.
Alternatively, if Google has already automatically created a listing for your business, you can claim it by clicking the “Own this business?” link that appears on the listing in Google.
Google Reviews WordPress Plugin
Once you have your Google Business Profile listing, you can use a dedicated Google Reviews WordPress plugin to embed reviews from that listing in your WordPress site.
You can find a number of free options that will embed reviews for you, though most also offer premium versions that add more features.
Below, you’ll learn how to use three different free plugins to add Google Reviews to WordPress:
- Widgets for Google Reviews – this plugin offers the simplest setup process because of the way that it pulls in your Google Reviews. However, it relies on a third-party service to achieve this simplicity.
- Plugin for Google Reviews – you’ll need to create a Google Places API key before you can use it (more on that next). It keeps everything on your own site and still gives you a good amount of flexibility.
- Reviews Block for Google – you get a dedicated editor block to add your Google Reviews, though you’ll still need to create a Google Places API key. The downside is that its free version doesn’t give you nearly as much flexibility as the other plugins when it comes to layouts and review filtering.
While all three plugins serve the basic purpose of adding Google Reviews to WordPress, each has different strengths and weaknesses.
There’s no single “best” option – it’s really just about choosing the option that best meets your needs. As you read through the tutorials below, you should gain a better understanding of which plugin will be best for your site.
Google Places API Key (Optional)
This last detail won’t apply to all plugins. However, many Google Reviews WordPress plugins will require you to create something called a Google Places API key.
So – what is that, and why do you need it to add Google Reviews to your site?
An API is a way for different computers/services to talk to one another. In this case, it’s a way for your WordPress site to talk to Google.
Essentially, the API lets your WordPress site send a message to Google saying, “Hey Google, I want to pull in the reviews from this Google My Business listing. Can you please send me that data?”.
To prevent abuse, Google requires that you register for an API key, which lets your WordPress site authenticate itself when making these requests. Basically, it’s like saying “Hey Google, I have permission to access this data. So now can you send it over?”.
In order to function properly, most plugins will ask you to create your own API key. While this might sound a bit technical, it really just involves following step-by-step instructions and clicking a bunch of buttons.
With that being said, there are some plugins that don’t require you to create your own API key. Typically, these plugins get around this by fetching the data to their own servers using their own API key and then delivering it to your site from there.
Now that you know what you need, here’s how it works to set up all three plugins from above…
Plugin #1: Widgets for Google Reviews Tutorial
Widgets for Google Reviews offers the absolute simplest way to add Google Reviews to WordPress because it doesn’t require you to create a Google Places API key.
The tradeoff, however, is that the plugin loads your review data from its own servers, rather than keeping everything on your WordPress website. That’s not necessarily a bad thing – it’s just important to understand the pros and cons.
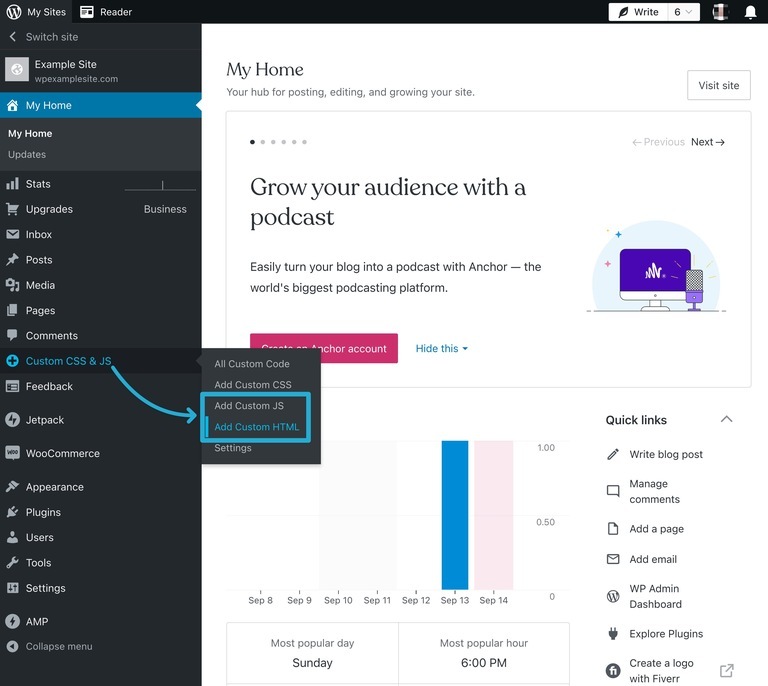
To begin, install and activate the plugin on your website. If you’re using WordPress.com, you’ll need to be using the WordPress.com plugin-enabled plan so that you’re able to install your own plugins. If you’re using a different plan, you can follow these instructions to upgrade.
1. Add Your Google Places ID
Once you’ve installed and activated the plugin, you can get started by going to the new Trustindex.io menu in your WP Admin.
First, you need to add your Place ID, which tells the plugin which business you want to display reviews for.
To find the Place ID for your business, go to Google’s official Place ID Finder tool and enter your business’s name or address. You’ll then see the Place ID appear in a popup:

Copy the Place ID. Then, paste it into the plugin’s settings in your WP Admin and click Check.
You should then see your business. If everything looks good, click the Connect button:

2. Choose Your Review Layout
After clicking Connect, the plugin will automatically pull in real Google Reviews for your business.
Now, you can choose the layout that you want to use to display your reviews. You can choose from different formats such as sliders, lists, grids, badges, and more. In the next step, you’ll be able to customize the style of the layout that you choose.
When you find a layout that you like, click the blue Select button next to it:

3. Customize Review Layout Style
Once you select your layout, you’ll get additional options to customize its style, such as choosing different background colors or borders.
Again, look for a style that you like and click the Select button next to it:

4. Configure Review Widget Behavior
Next, you can configure how your widget behaves, such as filtering which reviews to display and whether or not to show a reviewer’s profile picture.
For example, you could only show English-language reviews that are four stars or higher.
Once you’re happy with the configuration, click Save and get code to finalize your choices:

5. Embed Google Reviews in WordPress
To finish things out, you’ll need to add the shortcode that the plugin gives you to the location where you want to display your Google Reviews widget.

For example, if you want to include your reviews on your site’s homepage, you could open the editor for your homepage and paste the shortcode into the Shortcode block like this:

And that’s it! Your Google reviews should show up on your site when you open that page:

Plugin #2: Plugin for Google Reviews Tutorial
Plugin for Google Reviews is another popular option that will keep everything on your own server. The tradeoff, though, is that you’ll need to create your own Google Places API key in order to use it.
To begin, install and activate the plugin on your website. If you’re using WordPress.com, you’ll need to be using the WordPress.com plugin-enabled plan so that you’re able to install your own plugins. If you’re using a different plan, you can follow these instructions to upgrade.
1. Create and Add Google Places API Key
To get started with this plugin, you’ll first want to create your Google Places API key and add it to the plugin’s settings.
To help you do this, the plugin’s developer maintains detailed instructions that show you step by step how to create the necessary API key.
To find these instructions, open your WP Admin and go to Google Reviews → Support → Full Installation Guide.
If you scroll down, you should see the step-by-step instructions for creating the API key:

Once you have your API key, go to Google Reviews → Settings → Google and paste it into the box:

Make sure to save your changes.
2. Create Your Google Reviews Widget
Next, go to Google Reviews → Widgets → Create Widget to create your first Google Review embed:

3. Add Your Place ID
To add the Place ID for your business, click the orange Connect Google button in the top-right corner.
Again, you can find the Place ID for your business using the official Place ID Finder from Google.
Then, add the Place ID to the widget’s settings and choose the preferred language for your reviews. Then, click Connect Google again:

4. Style Your Google Reviews Widget
Now, you should see a live preview of your reviews in the interface.
To control the layout and style of those reviews, as well as which reviews to include, you can use the options in the sidebar.
As you make changes in the sidebar, you’ll automatically see the live preview update:

5. Embed Google Reviews in WordPress
To finish things out, you need to embed your reviews using the shortcode that the plugin provides:

If you don’t see the shortcode, you can try saving your changes and refreshing the page.
You can add this shortcode anywhere on your site using the Shortcode block.
For example, if you want to add Google Reviews to your homepage, you would add a Shortcode block to that page and paste in the plugin’s shortcode:

You’ll then see the reviews on the frontend of your site:

Plugin #3: Reviews Block for Google
Reviews Block for Google is another free option to embed Google Reviews in WordPress.
Like the previous plugin, you’ll need to create your own Google Places API key to use this plugin. However, the key differentiator for this plugin is that it gives you a dedicated editor block to add Google Reviews, rather than requiring you to work from a separate interface and use shortcodes.
If you like the block-based approach, that might make this one a better option for your situation. However, it doesn’t give you as many options for customizing how your reviews look (at least not unless you opt for the paid version).
To begin, install and activate the plugin on your website. If you’re using WordPress.com, you’ll need to be using the WordPress.com plugin-enabled plan so that you’re able to install your own plugins. If you’re using a different plan, you can follow these instructions to upgrade.
1. Add Block and Enter Google Places API Key
To begin, open the post or page where you want to embed Google Reviews.
Then, add the new Reviews Block for Google block, which you can insert just like any other block.
When you first add the block, it will prompt you to enter your Google Places API key.
If you need some help creating the API key, the plugin’s developer has video documentation that shows you how to set it up.
Once you’ve created your Google Places API key, paste it into the block’s settings and click the Save API Key button:

2. Choose Your Business
Once you save your API key, you’ll get a new interface where you can search for your business by its name or address:

Once you select it, you should automatically see a full card for your business.
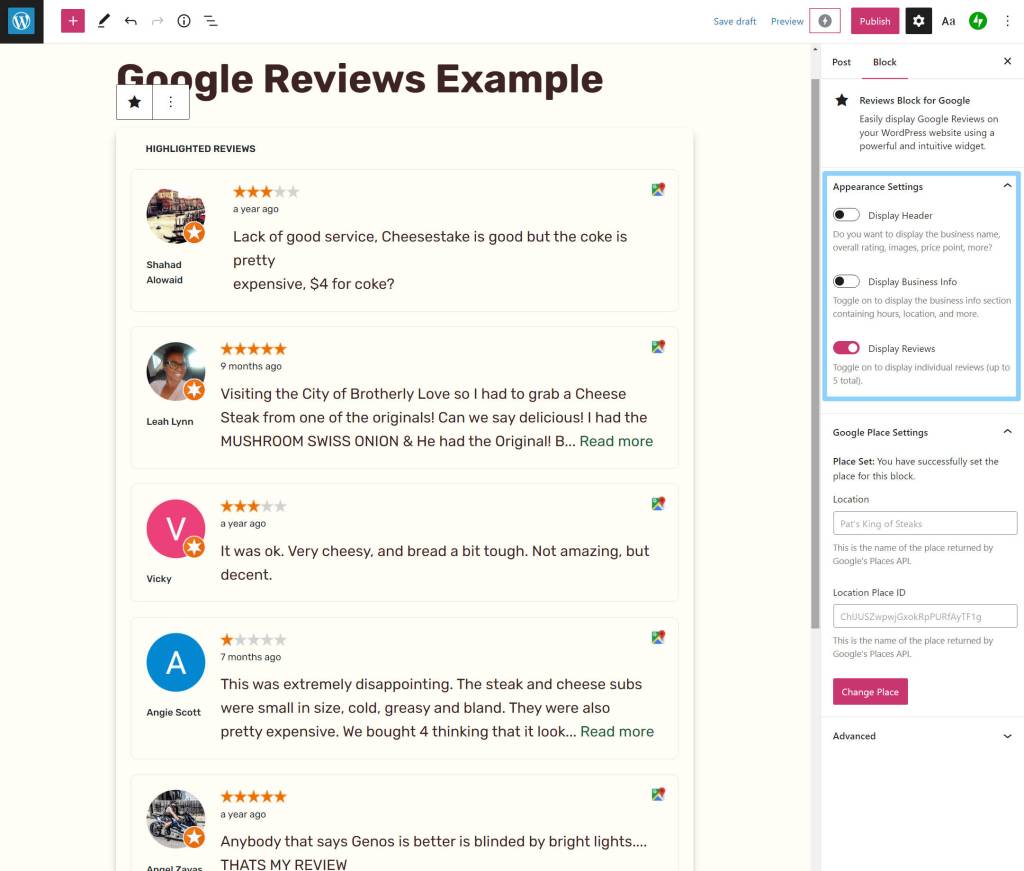
3. Customize Block Layout
To finish things out, use the block’s settings to customize what information to display. By default, the block will display both the reviews and a card that contains your business’s details:

If you don’t want to display that extra information, you can turn off the options for Display Header and Display Business Info to only show a list of your business’s five most recent reviews:
Unfortunately, the free version of the plugin doesn’t give you options to adjust the review layout or filter reviews. You’ll need to pay for the premium version if you want those features.
Add Google Reviews to WordPress Today
If you have a local business, embedding real Google Reviews on your website is a great way to build trust with your visitors and send local SEO signals to Google.
With the right Google Reviews WordPress plugin, you can embed reviews anywhere on your site using stylish layouts.
In this article, you learned how three of the most popular plugins work – all of which have a free version:
- Widgets for Google Reviews – this plugin has the absolute simplest setup process because you don’t need to create an API key. However, your data will load from the plugin developer’s servers, which is how it’s able to achieve such simplicity.
- Plugin for Google Reviews – the setup for this plugin is a little more involved because you’ll need to create your own Google Places API key, but it keeps everything on your WordPress site rather than loading reviews from a third-party server.
- Reviews Block for Google – this plugin gives you a dedicated editor block instead of requiring you to use separate interfaces and shortcodes. However, its free version doesn’t give you as much control over your reviews.
If you’re on the WordPress.com plugin-enabled plan, you can install any one of these plugins today to start adding Google Reviews to your WordPress.com website.
If you haven’t upgraded to the WordPress.com plugin-enabled plan yet (or you’re still in the planning stages of your site), purchase the WordPress.com plugin-enabled plan today to install useful plugins like these, plus a lot of other must-have WordPress plugins!
You might also like: How to Add Reviews to Your Product Pages

Brand new bloggers, small businesses, and major brands like TIME, TED, and Spotify all call WordPress.com home.