WooCommerce vs. BigCommerce: qual è il migliore nel 2024? La CNN ha sottolineato
Autore: La Redazione
-

WordPress sospende gli aggiornamenti dei plugin per combattere gli attacchi alla supply chain
WordPress ha adottato misure contro gli attacchi alla supply chain. Questi tipi di attacchi circolavano tramite aggiornamenti dei plugin in cui gli hacker aggiungevano codice dannoso al plugin.
Dallo scorso weekend, WordPress ha sospeso tutti gli aggiornamenti per i plugin. Gli aggiornamenti saranno sospesi finché il creatore del plugin non reimposterà la password e non effettuerà l'accesso.
Arrestare gli attacchi alla supply chain
Le misure erano necessarie per fermare gli attacchi in corso alla supply chain. In questi attacchi, gli hacker hanno utilizzato in modo improprio le credenziali di accesso acquisite in precedenti violazioni dei dati, che erano spesso reperibili online. Queste violazioni dei dati potrebbero non essere state correlate a WordPress, ma gli hacker sono stati in grado di accedere agli ambienti WordPress di utenti che hanno utilizzato le stesse password su siti Web diversi.
Dopo aver effettuato l'accesso, gli hacker sono riusciti ad aggiungere codice dannoso ai plugin. Questo codice è stato diffuso tramite aggiornamenti a tutti gli utenti dei plugin.
I ricercatori hanno segnalato un'altra vulnerabilità nel plugin Formator per i moduli Web, ad aprile. La vulnerabilità renderebbe vulnerabili centinaia di migliaia di siti Web. Questa sarebbe una vulnerabilità che potrebbe interessare un numero relativamente basso di siti Web. A gennaio, il Plug-in di sostituzione della ricerca migliore è stato scoperto che non è sicuro ed è stato installato su più di un milione di siti web in tutto il mondo.
Resetta la password
Se un utente deve reimpostare la password, significa che i ricercatori di sicurezza di WordPress hanno trovato le credenziali di accesso online. Il sistema di gestione dei contenuti (CMS) ulteriori stati che agli utenti che non hanno creato plugin potrebbe essere chiesto di effettuare nuovamente l'accesso se si scoprisse che le password sono state trapelate. “Riceverai un'e-mail dalla Directory dei plugin quando sarà il momento di reimpostare la password. Non devi intraprendere alcuna azione prima di ricevere una notifica.”
Leggi anche: Il plugin WordPress per i moduli web contiene una vulnerabilità critica
-
Create Eye-Catching WordPress Sliders and Carousels – Go WordPress
Searching for that perfect slider plugin to add a slider or carousel to your WordPress website?
Sliders and carousels are common design elements for all types of websites, from eCommerce stores to blogs, brochure websites, and more.
Because there’s such a need for this functionality, you can find a ton of free or paid slider plugins to help you create sliders.
If you’ve been browsing the best WordPress slider plugin lists, you’ve probably come across one name in particular – Smart Slider 3.
Smart Slider 3 gives you the ability to design your own custom slides using a visual builder, along with advanced support for animations, dynamic slider content, and plenty more.
In this Smart Slider 3 review, you’ll learn everything that you need to know about Smart Slider 3, including the following:
- Its five standout features.
- How to create sliders with Smart Slider 3.
- Smart Slider 3 pricing details.
- When you should use Smart Slider 3 (and when you might want to consider a different solution).
- How to install Smart Slider 3 on WordPress.com.
What Does Smart Slider 3 Do?
By the numbers, Smart Slider 3 is the most popular WordPress slider plugin that’s listed in the WordPress.org plugin directory.
While the plugin is packed with features to help you create different types of sliders, there are five key features that help explain its popularity:
- Support for four different layout types.
- A visual, drag-and-drop builder that lets you design custom slides.
- Strong animation support for various slider elements.
- Dynamic slider integrations to automatically create sliders from blog posts, WooCommerce products, and lots, lots more.
- 180+ pre-built slider templates to help you save time.
Here’s a more detailed look at those five standout features…
Create Four Different Layout Types
First off, Smart Slider three gives you a few different options for controlling the layout of your sliders, plus a bonus option that goes beyond sliders.
In terms of the sliders themselves, you get the following options:
- Simple – a “standard” slider that shows one slide at a time and scrolls through.
- Carousel – a carousel shows multiple items at the same time and rotates through them. You’ll often see these used to display eCommerce products, but you can use them in other ways, too. Here are some tips for using carousels well.
- Showcase – this is kind of a blend between the Simple and Carousel types.
Beyond those three sliders, you also get a fourth layout option – Block.
A block isn’t really a slider because it only has a single slide, but it can still come in handy in some situations. For example, you could use the Block layout type to create the hero section of your website.
If you’ve never heard this term before, the “hero” section typically appears at the top of the homepage or a landing page and includes a headline, image/video, and CTA button.
Design Sliders With a Visual, Drag-and-Drop Builder
One of Smart Slider 3’s standout features is its visual, drag-and-drop builder.
You can see a visual preview of each slide and adjust its design using drag and drop and built-in settings – no code needed.
To add content to your slides, you can use “layers”. Each individual layer is a different type/piece of content. Here are some examples of individual layers:
- Image
- Video
- Headline
- Paragraph text
- Button
- Row
- Icon
- Audio player
For each layer, you’ll get a bunch of settings to control its content, design, and other behavior.

Animate Every Element in Your Slides (Including a Timeline)
In addition to letting you customize the content of your slides, Smart Slider 3 also gives you powerful features to animate each individual layer in your slide, which lets you create more engaging experiences for your visitors.
To help you coordinate your animations effectively, you also get a timeline view that lets you see the animation timing for each individual layer on the slide.
You can also “play” the animation sequence right from the visual builder, which lets you see how your animations come together in the real world.
Dynamically Insert Content In Your Sliders
Another area where Smart Slider 3 excels is that it lets you create “dynamic” sliders.
With a dynamic slider, the content of your slider will automatically populate based on some content source that you choose.
One common setup would be a slider of your five most recent blog posts. Each slide might include the featured image as the background, along with the post’s title and a button that links to the full post.
Whenever you publish a new blog post, Smart Slider 3 would automatically insert that in the slider (and remove the oldest post) – you don’t need to manually edit it every time you publish a post.
Where Smart Slider 3 gets really cool, though, is that it supports 32+ dynamic content sources, which lets you go far beyond blog posts. Here are some examples:
- WooCommerce products – you could create sliders to automatically show your recently added products, your best-selling products, your on-sale products, and more.
- YouTube videos – if you have a YouTube channel, you could automatically insert your latest videos in the slider. Or, you could also automatically insert videos from a certain playlist.
- Custom post types – you can insert content from any WordPress custom post type, which opens up tons of possibilities. For example, you could create sliders of portfolio projects, client testimonials, logos of clients that you’ve worked with, and more.
- Events – you can automatically insert upcoming events from popular event calendar plugins, including The Events Calendar and Events Manager.
- Social media – you can include Instagram posts, Facebook posts, tweets, and more.
- RSS feeds – you can dynamically populate sliders from any content in an RSS feed.
- Server folder – you can automatically fill a slider with images or videos from a folder on your server. As you upload images/videos to that folder, they’ll automatically appear in the slider.

Save Time With 180+ Pre-Made Templates
While Smart Slider 3 gives you all the tools you need to build completely custom sliders from scratch, you might not need to because Smart Slider 3 also comes with 180+ pre-made templates.
You can import these to use as the baseline for your slider and then just customize the demo content to match your needs.
These not only save you time when creating sliders, but they also let you access professionally made designs for a range of niches and use cases.
How to Create Sliders With Smart Slider 3
So how can you make use of all those features? Here’s what it’s like to create a slider with Smart Slider 3.
1. Create a New Project
Smart Slider 3 calls each slider a “project”, so you can get started by creating a new project.
When you do that, you’ll be able to choose between starting a blank project from scratch or using one of the 180+ templates:

If you choose the template option, you’ll then get a new screen to browse the template library. You can use the filters to navigate the different templates and import them by clicking the Import button:

On the other hand, if you start your project from scratch, you’ll see a screen to set up the basic canvas, including the slider type and dimensions:

2. Configure Slider Settings
Once you create your project, Smart Slider 3 will launch you into the general settings area for your slider.
Here, you can navigate different tabs across the top that let you access settings such as the controls to move the slider left/right, animations, autoplay behavior, and more:

3. Design Individual Slides
To customize individual slides, you use the interface at the top of the general settings area.
You should see a button that lets you create a new slide, along with a list of any existing slides that you might have imported as part of a template.
To create a new slide, click Add Slide. To edit an existing slide, hover over that slide and click the Edit button.
You can also duplicate existing slides by clicking the three dot icon:

If you choose the option to add a new slide, you can also choose from different slide types. For example, to dynamically populate a slide, you need to choose the Dynamic Slides option. More on this in a second.
This will launch you in the visual builder, which looks something like this:

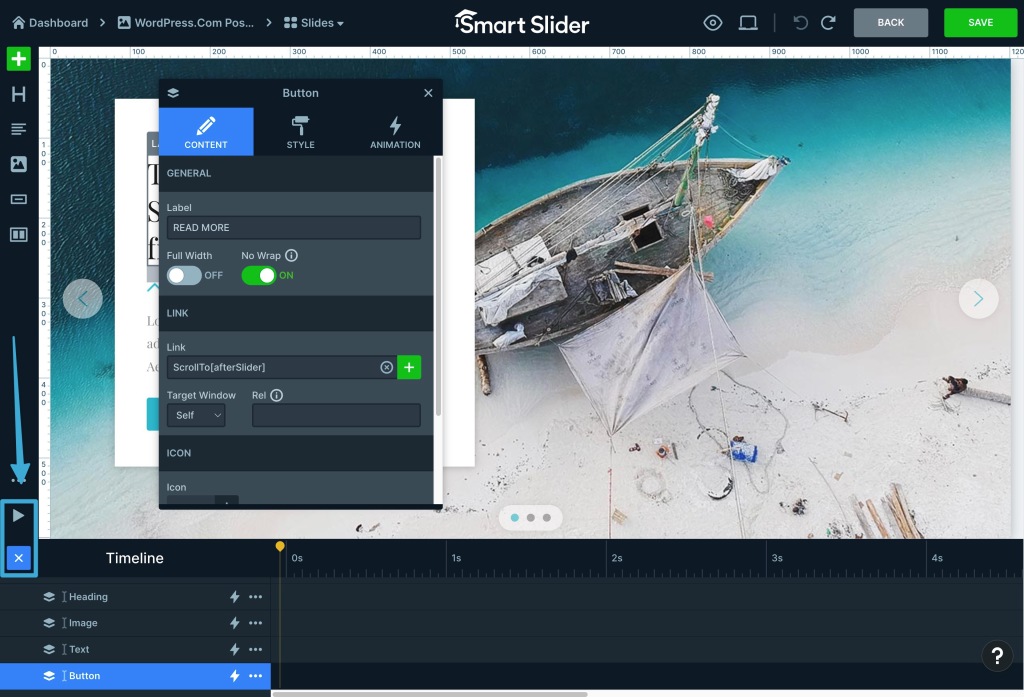
To add content, you can add new layers using the options on the left. A layer could be an image, a heading, text, a button, and so on:

To move layers around, you can use drag and drop on the visual preview.
To edit the content and settings of a layer, you can click on it to open a popup interface. For example, if you click on a button layer, you’ll open a popup to customize the button text, link, icon, colors, animations, and more:

There are also some other nice touches. For example, if you click the button at the bottom of the left sidebar, you can see a timeline view of any animations you’ve assigned to various layers. You can also click the play icon to see those animations play out in real-time:

There’s also a responsive preview option that lets you see your design on different devices.
Once you’re happy with how everything looks, make sure to save your changes.
Then, you can repeat the process to create/customize additional slides.
How to Create Dynamic Slides
If you want to create dynamic slides that pull in information such as your latest blog posts, WooCommerce products, YouTube videos, and so on, then you’ll need to choose the Dynamic Slides type when creating a new slide.
This will open all of the potential dynamic slide sources – here’s a partial look at all of the options (there are more sources than shown in the screenshot):

If you choose the Posts option, you’ll get some additional settings to control which posts to display. For example, you could only include posts in a certain category or with a certain post type:

Then, you can set up your actual filters, including all kinds of simple or advanced options. You can also choose how many slides you want to generate. For example, you could only display the five most recent posts that match your filters:

Once you’ve made those choices, it will launch you into the visual builder again.
It works pretty much the same as before, with the only difference being that you can use simple template tags to control where to insert the dynamic information.
For example, for a blog post, you would add the {title} template tag to the heading layer where you want to display the blog post’s title.
4. Embed Your Slider
Once you’ve designed all of your slides and configured the general slider settings, the last step is to embed the slider where you want it to display.
Smart Slider 3 offers several options here, and you can choose whichever works best for you:
- Dedicated editor block in the native WordPress editor
- Shortcode
- PHP function that you can add directly to your child theme’s template files
- Dedicated integrations with third-party page builder plugins such as Elementor and Beaver Builder
For example, to add a slider to a page in the native WordPress editor, you just need to add the Smart Slider 3 block and then use the block’s settings to choose the slider that you want to embed:

Smart Slider 3 Pricing
Smart Slider 3 comes in both a free version and a premium version with more features.
With the free version, you get access to all of the core features, including the visual, drag-and-drop builder, and the ability to insert your latest blog posts with dynamic content.
Along with that, you can access two different slider types and six different layers to use in your designs:
- Image
- Heading
- Text
- Button
- Vimeo
- YouTube
You can also access a limited selection of 14 pre-made templates.
For a lot of users, the free version has plenty of power to get the job done.
However, if you want more flexibility, you can upgrade to the premium version to access, in part, the following improvements:
- Two more slider types (four total)
- 26 layer options (versus six in the free version), including new options such as animated headings, lists, counters, self-hosted video, audio, form input, and more.
- More advanced dynamic content support (32+ total sources). Beyond blog posts (free), you can also dynamically insert WooCommerce products, your latest YouTube videos, Facebook posts, tweets, images from a folder on your server, and more.
- Animations to create more engaging designs. You can animate text, layers, backgrounds, and more.
- Other effects to create more engaging designs. For example, you can add parallax effects, Ken Burns effects, Particles effects, and more.
- 180+ pre-made slider templates (versus just 14 in the free version).
- Lightbox support to open a full-screen image or video when the user clicks on a slide.
- Lazy loading to improve the performance of your sliders and speed up your website.
If you want all of those features, the premium version of Smart Slider 3 starts at $49 for use on a single site, which includes lifetime updates and support.
If you want to use the plugin on more than a single site, there are also plans with higher limits. For example, support for up to three sites will cost you $99.
The higher-site limit plans also come with priority support.
Beyond that, all plans are backed by a 14-day money-back guarantee.

Who Should Use Smart Slider 3?
Smart Slider 3 is definitely one of the top slider plugins for WordPress. However, it might not be the optimal plugin for every single use case.
Here are some details on when Smart Slider 3 is the right tool and when you might want to consider a different option for sliders…
Where Smart Slider 3 Excels
Overall, Smart Slider 3 is a great option for creating more advanced types of sliders.
It has three main advantages over a lot of the other WordPress slider plugins:
- Powerful design capabilities – you get a visual, drag-and-drop builder, the ability to add multiple layers, and tons of animations and design effects.
- Flexible content sources – in addition to static sliders, you can create dynamic sliders from tons of different sources, including blog posts, WooCommerce products, social media posts, YouTube videos, and more.
- Functioning free version – most other popular slider plugins with visual builders only come in premium versions, whereas Smart Slider 3’s free version is pretty functional by itself.
If you think you’ll take advantage of those design capabilities and/or flexible content sources, then Smart Slider 3 is definitely one of the top options to consider.
Add on the fact that it has a functioning free version, and you get a very attractive value proposition.
When to Consider a Different Slider Solution
If you just want to create simple sliders, you might prefer a simpler slider plugin than Smart Slider 3.
For example, if you just want to create a slider of images without adding any text, buttons, design elements, and so on, then there are tools that give you a more straightforward way to accomplish that.
If you’re using WordPress.com, one simple alternative is to just use the Slideshow block, which you can access in the editor.
This block makes it easy to create a basic image slideshow without needing to install a plugin. You can use drag and drop to control the order of the images while also using the block’s settings to access features such as transition effects and autoplay behavior.

If you want a little more control while still keeping things comparatively simple, you could consider a free slider plugin such as MetaSlider.
While MetaSlider lacks the visual builder and advanced features of Smart Slider 3, it offers a more streamlined way of creating sliders, which can make it easier to use for basic image sliders.
How to Install Smart Slider 3 on WordPress.com
If you’d like to use Smart Slider 3 on your WordPress.com site, you’ll want to make sure that you’re on a plugin-enabled WordPress.com plan so that you can install your own custom plugins (or one of the legacy Business or eCommerce plans).
Otherwise, you can follow these instructions to upgrade your plan.
Once you’ve verified that you’re on the right plan, you can install Smart Slider 3 by going to Plugins → Add New in your WP Admin:
- To install the free version of Smart Slider 3, search for it using the search box. Select it in the search results and then click the Install and activate button on the next screen.
- To install the premium version of Smart Slider 3, click the Upload button in the top-right corner. Then, upload the ZIP file that you received from the Smart Slider 3 website after making your purchase.

For a more detailed look, here’s the full guide on how to install plugins on WordPress.com.
Final Thoughts on Smart Slider 3
Overall, Smart Slider 3 is an excellent slider plugin for users who want to design custom slides with the power of a visual builder.
Whereas many simple slider solutions just let you build sliders from the images themselves, Smart Slider 3 goes further and lets you add your own designs, including text, buttons, videos, and lots more.
You can also set up complex animations, including an actual animation timeline feature to help you nail the perfect timing.
Another area where it excels is creating dynamic sliders that automatically pull in your latest blog posts, WooCommerce products, YouTube videos, social media posts, and more.
If you want these advanced slider features, Smart Slider 3 gives you tons of flexibility and lets you get started for free, which are some of the biggest reasons that have helped make it the most popular free slider plugin.
If you’re using a plugin-enabled WordPress.com plan already, you can install the free version of Smart Slider 3 right now to see how it works. If not, upgrade today to access the ability to install Smart Slider 3, along with all of the other useful WordPress plugins that exist.
You might also like: WordPress Image Carousels: Dos, Don’ts, and Top Tips

You can schedule appointments, create subscription products, automate your marketing efforts, and much more.
-
Disabilitare i prodotti correlati sul tuo negozio online
Negli ultimi anni, la crescita del settore dell’e-commerce ha visto una maggiore comodità e personalizzazione dello shopping.
Ha attirato una maggiore concorrenza e l’uso del commercio mobile. Qualsiasi e-store che voglia rimanere competitivo deve creare un'esperienza di acquisto fluida ed efficiente. Milioni di e-store utilizzano WooCommerce per sviluppare e gestire i propri negozi.
È un potente plugin WordPress open source utilizzato per promuovere le vendite online. Questo strumento contiene molte funzionalità utili. Una delle caratteristiche che risaltano sono i “prodotti correlati”. Questa funzione consiglia prodotti agli acquirenti per migliorare la loro esperienza. A volte operatori di marketing online potrebbe voler disattivare questa funzione per diversi motivi. Esaminiamo i passaggi per rimuovere i prodotti correlati da WooCommerce.
Informazioni sulla funzionalità dei prodotti correlati a WooCommerce
WooCommerce è un plugin facile da usare con molte funzionalità utili. Ha una grande libreria personalizzabile con centinaia di temi e plugin. Questi plugin ti permettono di personalizzare il tuo marchio online. WooCommerce ha anche una funzionalità di gestione dei prodotti. Permette agli utenti di gestire l'inventario. Altre funzionalità includono strumenti di analisi, marketing, pagamento e spedizione.
La tecnologia ha reso facile fare acquisti ed effettuare ordini online. Esistono centinaia di negozi online dove puoi fare acquisti e ordinare con spedizione. Uno dei siti di shopping online più popolari è Amazon. Questa piattaforma ti consente di creare un account ed effettuare i tuoi acquisti da lì. Il sito salva la cronologia degli ordini per consentirti di fare riferimento in qualsiasi momento. Potresti voler nascondere la cronologia degli acquisti a causa di problemi di privacy. La domanda principale che ti viene in mente dopo questa idea è: puoi nascondere gli ordini su Amazon? Puoi nascondere gli ordini su Amazon attraverso pochi semplici passaggi. L'acquisto Amazon hide più semplice è archiviare la cronologia degli acquisti. Un altro processo semplice per nascondere gli ordini Amazon è usare un account famiglia.
I “Prodotti correlati” sono una funzionalità preziosa in un negozio WooCommerce. Quando un cliente acquista determinati articoli, questa funzione identifica le sue preferenze. Raccomanda quindi prodotti simili o complementari. Ciò offre all'acquirente più opzioni da confrontare e scegliere.
Motivi per disattivare la funzione Prodotti correlati
A volte potrebbe essere utile nascondere i prodotti correlati a WooCommerce. Potresti farlo per consentire ai clienti di concentrarsi sul prodotto principale. La disattivazione di questa funzione potrebbe aiutare a caricare più velocemente la pagina del tuo e-store. Può aiutare a ridurre al minimo il disordine sulla pagina. Semplifica l'esperienza di acquisto.
Disattivare i prodotti correlati aiuta a semplificare il processo di pagamento del cliente. Semplificare questo processo riduce al minimo le possibilità di un carrello abbandonato. Puoi disattivare questa funzionalità se preferisci un marketing mirato. Invece di lasciare che un'app consigli articoli, puoi fare raccomandazioni personalizzate.
Potresti preferire avere il controllo completo del tuo negozio online. Questo ti consente di personalizzare il tuo negozio e le pagine dei prodotti. La disattivazione ti consente di creare un elenco di prodotti compatto. Meno visualizzazioni di prodotti aumentano la velocità di accesso e la tua pagina potrebbe classificarsi meglio su Ottimizzazione per i motori di ricerca.
Come rimuovere i prodotti correlati in WooCommerce
Puoi rimuovere i prodotti correlati WooCommerce anche se non sei un programmatore. Alcuni metodi di rimozione sono semplici ma altri sono complicati. Ecco alcuni dei metodi che puoi provare.
Utilizzare un frammento di codice
Il metodo più semplice per nascondere i prodotti correlati è aggiungere un codice ai tuoi temi WooCommerce. Per farlo, hai bisogno di un file php. Segui questi semplici passaggi per farlo.
- Apri la funzionalità Theme Files sul tuo plugin WooCommerce. Per farlo, accedi al tuo sito WordPress.
- Nella dashboard del sito, apri l'icona Aspetto. Scorri e apri Theme Editor. Apri il file functions.php.
- Digita il codice ritagliato come estensione del file Functions.php. Il codice dovrebbe assomigliare a questo:
Rimuovi i prodotti correlati move_action ('woocommerce_after_single_product_summary', 'woocommerce_output_lated_products', 20);
- Per terminare il processo, clicca sull'icona Aggiorna file. La funzionalità dei prodotti correlati verrà disattivata.
Personalizza il tuo tema
Otterrai un maggiore controllo del tuo e-store quando personalizzi il tuo tema. Questo è un altro semplice processo per nascondere i prodotti correlati WooCommerce.
Inizia creando un child theme sul tuo e-store. Questo tema protegge le tue modifiche una volta che clicchi sul file di aggiornamento. Per creare un child theme, apri la directory themes e crea una nuova cartella. Aggiungi questi file alla cartella: functions.php. e style.css. Vai al passaggio successivo e apporta le modifiche.
Il file related.php è quello che visualizza i prodotti correlati durante lo shopping. È necessario sovrascrivere questo file adesso. Apri il tuo plugin WooCommerce e copia questo file – related.php. Otterrai questo file da woocommerce/templates/single-product/. Successivamente, incolla questo file nel file del tema figlio. Dovrebbe assomigliare a questo: your-child-theme/woocommerce/single-product/.
Nel passaggio finale, modifica il file modello. Per fare ciò, vai al file related.php. Questo è il campo che hai incollato nel tema figlio. Identificare la parte che mostra i prodotti correlati. Elimina questa parte e salva le modifiche.
Rimuovi prodotti correlati WooCommerce utilizzando cCstom CSS
Puoi anche nascondere i prodotti correlati con CSS personalizzati. Tieni presente che i CSS non rimuovono la funzionalità. Invece, lo nasconde dal tuo display. Segui questi passi.
Inizia accedendo al tuo sito WordPress. Nella dashboard, apri Aspetto e vai all'icona Personalizza. Nel campo Personalizzatore, apri il pulsante CSS aggiuntivo. Scrivi questo codice in questo campo.
.prodotti.correlati { display: nessuno; }
Per completare il processo, fare clic sul pulsante Pubblica. Ciò salverà le modifiche e nasconderà gli elementi correlati dalla visualizzazione.
Nascondi prodotti correlati WooCommerce con un plugin WooCommerce
Il plugin WooCommerce ti consente di modificare i file del tema e disattivare i prodotti correlati. Hai diverse opzioni di plugin per questo scopo. Un esempio è il plugin Disable WooCommerce Related Products. Puoi anche usare il plugin WooCommerce Product Page Customizer. Ecco come fare.
- Accedi a WordPress e apri la dashboard. Scorri fino al pulsante Plugin e apri l'icona Aggiungi nuovo. Trova il plugin che preferisci utilizzare e installalo. Una volta installato, attivalo.
- Successivamente, apri il campo Impostazioni del plugin che hai appena attivato. Naviga in questo campo per trovare l'opzione Disattiva prodotti correlati.
- I passaggi potrebbero essere diversi in alcuni plugin. Il vantaggio di questo metodo è che non è necessario conoscere la codifica. I plugin ti consentono anche di personalizzarli in molti modi.
Best practice per la gestione dei prodotti correlati
I suggerimenti sui prodotti sono una strategia utile per ottenere pagamenti più riusciti. Scopri metodi alternativi per suggerire articoli agli acquirenti dopo aver disabilitato i prodotti correlati. Questo può aiutare a migliorare l'esperienza di acquisto dei tuoi clienti online. Presta attenzione alle seguenti best practice.
Investire nell'email marketing
L'email marketing può sembrare semplice, ma il suo impatto è significativo. Ti aiuta a costruire relazioni durature con i clienti. Aumenta il traffico online e i tassi di conversione. I dati degli studi di mercato mostrano che l'email marketing ha un ROI elevato. Invia email mirate per promuovere i tuoi articoli. Suggerisci articoli correlati dopo che i clienti hanno effettuato richieste o effettuato il check-out.
Condividi recensioni e testimonianze dei clienti
Incoraggia i clienti a fornire feedback. Chiedi loro di recensire i tuoi prodotti e servizi. Se ricevi più recensioni positive, gli acquirenti che le leggono creeranno fiducia nei tuoi confronti. Molte persone possono effettuare acquisti in base alle recensioni positive.
Eseguire raccomandazioni manuali
I prodotti correlati forniscono consigli automatizzati sui prodotti. Puoi fornire consigli manuali dopo averlo disattivato. Puoi aggiungere spazi personalizzati sulla pagina del tuo prodotto per mostrare articoli gratuiti. I clienti possono prendere in considerazione l'acquisto di loro quando acquistano il prodotto principale.
Utilizzare visualizzazioni dinamiche dei prodotti
I display dinamici dei prodotti hanno molti usi. Puoi usarlo per mostrare promozioni o nuovi articoli. Aiutano anche a mostrare l'urgenza nell'acquisto di determinati articoli. Questa strategia utilizza immagini in costante cambiamento. Il suo obiettivo è attirare rapidamente l'attenzione degli acquirenti. Questa strategia non affolla le pagine. Puoi utilizzare slider o caroselli.
Conclusione
La funzionalità dei prodotti correlati su WooCommerce presenta molti vantaggi. Fornisce consigli automatizzati sui prodotti che possono aumentare le vendite. Potresti voler disabilitare questa funzione per diversi motivi. La disattivazione aumenta la velocità della tua pagina e la riduce. Semplifica il pagamento e riduce al minimo le carte abbandonate. Puoi disattivare questa funzione utilizzando codice, plugin o CSS. Se non hai esperienza di codifica, utilizza il metodo plugin.
-

Aumentano gli attacchi alla catena di fornitura dei plugin WordPress
I plugin di WordPress continuano a essere sotto attacco da parte di hacker che utilizzano credenziali rubate (da altre violazioni di dati) per ottenere accesso diretto al codice del plugin. Ciò che rende questi attacchi particolarmente preoccupanti è che questi attacchi alla supply chain possono insinuarsi perché il compromesso appare agli utenti come plugin con un normale aggiornamento.
Attacco alla catena di fornitura
La vulnerabilità più comune si verifica quando un difetto del software consente a un utente malintenzionato di iniettare codice dannoso o lanciare qualche altro tipo di attacco, il difetto è nel codice. Ma un attacco alla catena di fornitura si verifica quando il software stesso o un componente di quel software (come uno script di terze parti utilizzato all'interno del software) viene direttamente alterato con codice dannoso. Ciò crea la situazione in cui il software stesso fornisce i file dannosi.
La Cybersecurity and Infrastructure Security Agency (CISA) degli Stati Uniti definisce un attacco alla catena di fornitura (PDF):
“Un attacco alla supply chain del software si verifica quando un cyber threat actor si infiltra nella rete di un fornitore di software e impiega codice dannoso per compromettere il software prima che il fornitore lo invii ai propri clienti. Il software compromesso compromette quindi i dati o il sistema del cliente.
Il software appena acquisito potrebbe essere compromesso fin dall'inizio, oppure potrebbe verificarsi una compromissione tramite altri mezzi, come una patch o un hotfix. In questi casi, la compromissione si verifica comunque prima che la patch o l'hotfix entrino nella rete del cliente. Questi tipi di attacchi interessano tutti gli utenti del software compromesso e possono avere conseguenze diffuse per i clienti di software governativi, delle infrastrutture critiche e del settore privato.”
Per questo attacco specifico ai plugin di WordPress, gli aggressori utilizzano credenziali con password rubate per ottenere l'accesso agli account sviluppatore che hanno accesso diretto al codice del plugin per aggiungere codice dannoso ai plugin al fine di creare account utente di livello amministratore su ogni sito web che utilizza il plugin compromesso. Plugin WordPress.
Oggi, Wordfence ha annunciato che sono stati identificati altri plugin di WordPress come compromessi. Potrebbe benissimo essere il caso che ci saranno altri plugin compromessi. Quindi è bene capire cosa sta succedendo ed essere proattivi nel proteggere i siti sotto il tuo controllo.
Altri plugin WordPress attaccati
Wordfence ha emesso un avviso secondo cui sono stati compromessi più plug-in, incluso un plug-in per podcast molto popolare chiamato PowerPress Podcasting plug-in di Blubrry.
Questi sono i plugin compromessi recentemente scoperti e annunciati da Wordfence:
- Statistiche di integrità del server WP (wp-server-stats): 1.7.6
Versione patchata: 1.7.8
10.000 installazioni attive - Protezione dai clic non validi sugli annunci (AICP) (ad-invalid-click-protector): 1.2.9
Versione patchata: 1.2.10
Oltre 30.000 installazioni attive - Plugin PowerPress Podcasting di Blubrry (powerpress): 11.9.3 – 11.9.4
Versione patchata: 11.9.6
Oltre 40.000 installazioni attive - Ultima infezione – Immagini ottimizzate per SEO (seo-optimized-images): 2.1.2
Versione patchata: 2.1.4
Oltre 10.000 installazioni attive - Ultima infezione – Pod – Tipi di contenuto e campi personalizzati (pod): 3.2.2
Versione patchata: al momento non è necessaria alcuna versione patchata.
Oltre 100.000 installazioni attive - Ultima infezione – Twenty20 Immagine prima-dopo (twenty20): 1.6.2, 1.6.3, 1.5.4
Versione patchata: al momento non è necessaria alcuna versione patchata.
Oltre 20.000 installazioni attive
Questi sono il primo gruppo di plugin compromessi:
- Guerra sociale
- Widget Blaze
- Elemento collegamento wrapper
- Modulo di contatto 7 Componente aggiuntivo multi-step
- Mostra semplicemente i ganci
Maggiori informazioni su Attacco alla catena di fornitura del plugin WordPress qui.
Cosa fare se si utilizza un plugin compromesso
Alcuni plugin sono stati aggiornati per risolvere il problema, ma non tutti. Indipendentemente dal fatto che il plugin compromesso sia stato patchato per rimuovere il codice dannoso e che la password dello sviluppatore sia stata aggiornata, i proprietari del sito dovrebbero controllare il loro database per assicurarsi che non ci siano account admin non autorizzati aggiunti al sito web WordPress.
L'attacco crea account amministratore con i nomi utente di “Opzioni” o “PluginAuth”, quindi questi sono i nomi utente a cui prestare attenzione. Tuttavia, è probabilmente una buona idea cercare eventuali nuovi account utente a livello di amministratore non riconosciuti nel caso in cui l'attacco si sia evoluto e gli hacker utilizzino account amministratore diversi.
I proprietari di siti che utilizzano la versione gratuita o Pro di Wordfence del plugin di sicurezza Wordfence WordPress vengono avvisati se viene scoperto un plugin compromesso. Gli utenti di livello Pro del plugin ricevono firme malware per aver rilevato immediatamente i plugin infetti.
L'annuncio ufficiale di Wordfence riguardo a questi nuovi plugin infetti consiglia:
“Se hai installato uno di questi plugin, dovresti considerare la tua installazione compromessa e passare immediatamente alla modalità di risposta agli incidenti. Ti consigliamo di controllare i tuoi account utente amministrativi di WordPress ed eliminare quelli non autorizzati, oltre a eseguire una scansione completa del malware con il plugin Wordfence o Wordfence CLI e rimuovere qualsiasi codice dannoso.
Gli utenti Wordfence Premium, Care e Response, così come gli utenti Wordfence CLI a pagamento, hanno firme malware per rilevare questo malware. Gli utenti Wordfence gratuiti riceveranno lo stesso rilevamento dopo un ritardo di 30 giorni il 25 luglio 2024. Se stai eseguendo una versione dannosa di uno dei plugin, sarai avvisato da Wordfence Vulnerability Scanner che hai una vulnerabilità sul tuo sito e dovresti aggiornare il plugin dove disponibile o rimuoverlo il prima possibile.”
Per saperne di più:
Plugin WordPress compromessi alla fonte – Attacco alla Supply Chain
Immagine in primo piano di Shutterstock/Moksha Labs
- Statistiche di integrità del server WP (wp-server-stats): 1.7.6
-
How to Properly Add JavaScript to WordPress (3 Top Methods) – Go WordPress
Need to add JavaScript to WordPress but not sure where to start?
JavaScript can help you add all types of useful functionality to your WordPress site. However, if you want to take advantage of those benefits, you can’t just copy and paste the JavaScript into the WordPress editor.
Thankfully, there are still some easy ways to add JavaScript to WordPress, either using free WordPress plugins or your own DIY snippets.
In this post, you’ll learn all about how JavaScript can benefit your site and how you can properly add JavaScript to WordPress.
Beyond the manual method, that includes step-by-step tutorials for three of the most popular JavaScript WordPress plugins – all of which are free to use.
What Is JavaScript?
JavaScript, sometimes abbreviated as JS, is a popular client-side programming language that you can use to add a range of functionality to your WordPress site.
Most of WordPress is written in PHP, which is a server-side language. This means that your website’s server executes the code before delivering the final product to visitors’ browsers.
JavaScript, however, is a client-side language, which means it runs in your users’ browsers and not on your server. This opens up a lot of opportunities for adding dynamic functionality to your website, even after the page has already loaded.
Beyond that, you’ll also commonly use JavaScript to integrate third-party services into your site, such as tracking snippets like Google Analytics or live chat tools.
Can You Use JavaScript In WordPress?
Yes – you can absolutely use JavaScript in WordPress. In fact, you already enjoy the power of JavaScript on your site.
For example, while the core WordPress software is primarily written in PHP, it still relies on JavaScript for a lot of important functionality, such as the content editor and its many blocks.
Many WordPress themes and plugins also use JavaScript to power their functionality, such as slick navigation menus and slide-out effects.
And of course, as you’d expect from the fact that this post exists, you can also add your own custom JavaScript to your site when needed.
What Can JavaScript Do for WordPress Sites?
The possibilities of adding JavaScript to WordPress are pretty endless.
For most users, the most common use case for adding JavaScript to WordPress is integrating third-party tools and services into your site.
For example, most analytics/tracking services rely on adding a JavaScript snippet to your site. This is true of Google Analytics, Facebook Pixel, the Pinterest tag, and so on.
Similarly, a lot of third-party services use JavaScript snippets to integrate with your site. Here are a few examples, but these are by no means a complete list:
- A live chat tool might give you a JavaScript snippet to add the live chat widget to your site.
- Your email marketing service might use JavaScript to let you embed custom opt-in forms or other functionality on your site.
- A contact form tool might use JavaScript to help you embed the form on your site. For example, Typeform embeds its conversational forms using JavaScript.
Finally, you can also add your own custom JavaScript to your site to add all types of different functionality. For this last one, though, you’ll need some development knowledge if you want to customize your site using your own JavaScript (or you’ll need to pay a developer to do it for you).
Three Ways to Add JavaScript to WordPress
When it comes to adding JavaScript to WordPress, you have multiple options.
For most people, using a WordPress JavaScript plugin offers the simplest approach, but there are also manual methods if you prefer a more DIY approach.
1. Use a JavaScript WordPress Plugin (Best for Most People)
The best and simplest option for most people is to use a JavaScript WordPress plugin, which you might also see called a code snippet manager plugin, or something similar.
While the exact features will depend on the plugin, the basic idea is that these plugins give you an easy-to-use interface to add and manage JavaScript snippets directly from your WP Admin.
Here’s an example:

This approach has several advantages:
- Snippet management – if you’re adding multiple snippets to your site, these plugins make it easy to manage each snippet. You can give each snippet a title and use categories/tags to organize them. You can also easily enable and disable individual snippets as needed.
- Theme-independent – by storing your snippets in a plugin, they’ll still be active even if you change themes. This can be important if you’re adding theme-agnostic functionality, such as using JavaScript to add Google Analytics to WordPress.
- Conditional rules – if you don’t want to add your JavaScript snippets sitewide, you can easily add conditional rules to only load the JavaScript on certain content, for certain users, for users browsing on certain devices (smartphone vs desktop), and so on.
Here are some of the best WordPress plugins for JavaScript management:
A little further down in this post, you’ll find step-by-step tutorials for how to use three of the most popular plugins (all of which are free).
2. Use WordPress Hooks and the functions.php File of Child Theme (A Little More Complex)
If you don’t want to install a WordPress JavaScript snippet plugin, you can also manually add JavaScript to WordPress using your WordPress theme’s functions.php file and the WordPress hook system.
This method is a little more complex, but it lets you achieve a similar end result as the plugins above.
Essentially, the WordPress hook system lets you inject any content in your site’s header or footer, including JavaScript.
When combining some PHP code for the hook with your JavaScript, you can automatically inject it in your site. Here’s an example of the code that you would use to add JavaScript to your site’s header:
function wpcom_javascript() { ?>You can also use more complex PHP to add conditional IF statements, such as only adding the JavaScript to a certain post or page on your site.
Here’s an example of only adding JavaScript to a single page by targeting the page’s ID:
function wpcom_javascript() { if (is_page ('42')) { ?>If you do use your theme’s functions.php file, it’s important to use a WordPress child theme so that your JavaScript snippets don’t get overwritten when you update your theme.
As an alternative to using your child theme’s functions.php file, you can also create your own custom plugin to house these snippets.
The main advantage of using a custom plugin instead of your child theme’s functions.php file is that it makes your code snippets theme-agnostic. That is, you can change themes, and all of your JavaScript snippets will still be active.
You can still use the same code examples from above when creating a custom WordPress plugin.
3. Enqueue the JavaScript Using wp_enqueue_script (Mainly Just for Developers)
This last method is a little more complex and won’t apply to most use cases where you’re adding JavaScript to your site.
However, you might have more complex situations where you need to upload your own JavaScript file to your site and use it, rather than embedding a JavaScript snippet from a third-party service such as Google Analytics or Facebook.
This usually only applies to developers who are working on custom themes or plugins, but it could happen in other situations.
In this case, you would want to use the wp_enqueue_script function to register that JavaScript file with your WordPress site and tell WordPress where to load the file.
How to Add JavaScript in WordPress Using Plugins
While all of the methods above offer viable ways to add JavaScript to WordPress, the plugin approach is the best route for the reasons discussed above. Here’s a quick recap of those reasons:
- They make it easier to manage multiple snippets because each snippet is a separate entry and you can use titles, categories, and tags to organize snippets.
- You can store your snippets outside your theme, which means they’ll still be active on your site even if you switch themes.
- You can use conditional rules to only load snippets in certain situations.
Below, you’ll find tutorials for three of the most popular WordPress JavaScript plugins.
If you’re using WordPress.com, you’ll need to be on at least the WordPress.com Business plan to install your own custom plugins. If you haven’t already upgraded, you can upgrade by following these instructions.
If you’re on the Business or eCommerce plans already but you’re not sure how to install custom plugins, you can check out this guide for installing plugins on WordPress.com.
How to Use WPCode to Add JS to WordPress
Formerly known as Insert Headers and Footers, WPCode is one of the most popular WordPress plugins for JavaScript snippets.
While the plugin makes it easy to just inject sitewide scripts in your header and footer, one of its standout features is that it also lets you add conditional rules to control when to load scripts.
For example, you could only load JavaScript on certain content or for users who are logged in to your site (or not logged in). Or, you could do both at the same time! That is, add JavaScript to one specific page on your site and only load that script if the user is logged in.
Here’s how to get started:
- Install and activate the free plugin on your site.
- Go to Code Snippets → + Add Snippet in your WP Admin.
- Hover over the option to Add Your Custom Code (New Snippet) and choose Use Snippet.

Now, you’ll be in the full snippet editor interface.
At the top, you’ll want to do three things:
- Add a title to help you remember what the snippet does. You’re the only person who will see this.
- Set the Code Type equal to JavaScript Snippet.
- Add the code for your snippet to the Code Preview. The plugin will automatically add the opening and closing

Below that, you can choose where to add this JavaScript snippet on your site.
The most important options here are the Insertion settings. You can add your snippet sitewide to the header, footer, or body. For important snippets, you should choose the header, though the footer is slightly better from a performance perspective.
Alternatively, you can target it to specific content or even manually place it using a shortcode.
You can ignore the Basic Info section, though you’re free to add tags or internal notes to help you organize your snippets.
Finally, you have the option to use Smart Conditional Logic to add more rules for where/when to insert the snippet. For example, this is where you could configure the plugin to only load your snippet for logged-in users.
Again, you’re free to ignore these settings if you don’t need them.

When you’re finished configuring your snippet, make sure to click the Save Snippet button in the top-right corner.
Then, use the toggle beside that button to switch the snippet to Active to make it live on your site.

And that’s it! To insert additional snippets on your site, you can repeat the process to add each snippet separately.
How to Use Simple Custom CSS and JS to Add JS to WordPress
Simple Custom CSS and JS doesn’t offer as many conditional rule options as the WPCode plugin unless you pay for the Pro version. However, if you just want to add sitewide JavaScript snippets, it delivers on its name by offering a simple way to do so, even with the free version.
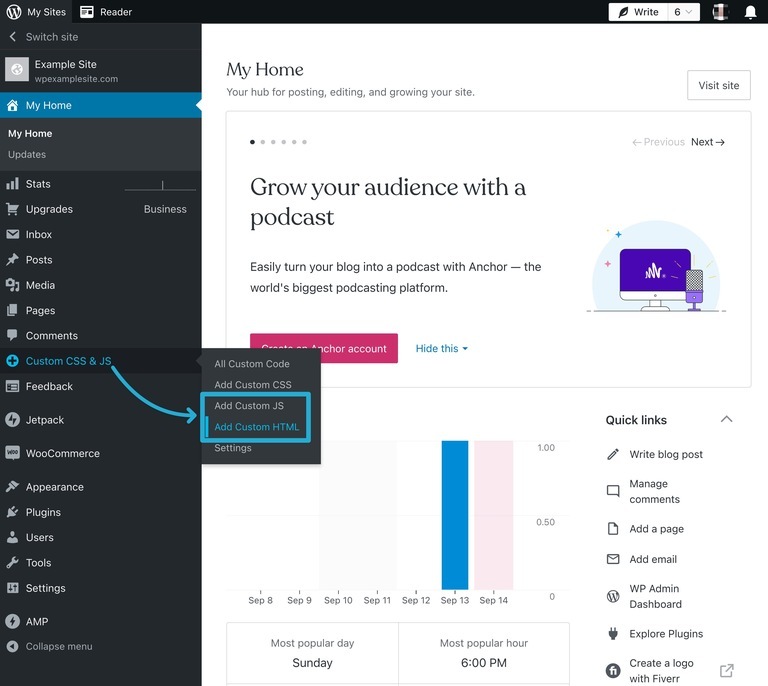
Once you’ve installed and activated the plugin, you can hover over the Custom CSS & JS menu in your WP Admin to choose between two options:
- Add Custom HTML – use this if you’re embedding a script from a third-party service, such as Google Analytics or your live chat service.
- Add Custom JS – use this to add your own custom JavaScript code.
Most of the time, you’ll probably want to use the Add Custom HTML option, even if it sounds a little unintuitive.
This will open the interface to manage this snippet. Many of the settings require the Pro version to access, but you still get a good amount of flexibility with the free version of the plugin.
Here’s what to configure:
- Add an internal title to help you remember what the snippet does.
- Paste the snippet into the text editor.
- Use the Where on page options to choose where to inject the snippet.
- Use the Where in site option to choose whether to add it on the frontend of your site or only in your WP Admin. Usually, you want to add it to the frontend.
Once you’ve made your choices, click the Publish button to make your JavaScript snippet live.

If you want to add more JavaScript, you can repeat the process for each additional snippet.
How to Use Header Footer Code Manager to Add JS to WordPress
Header Footer Code Manager is another popular free plugin that uses a similar approach to WPCode.
One advantage that it has is that it lets you target your JavaScript snippets to users browsing on certain devices (e.g. a smartphone or desktop).
However, the free version lacks the option to target specific users based on their logged-in status or role like WPCode allows, though you can access this feature by paying for the premium version of Header Footer Code Manager.
To get started, install and activate the plugin and then go to HFCM → Add New in your WP Admin:

Now, you should be in the interface where you can add your snippet.
At the top, you can use the box to configure details about your snippet:
- Snippet Name – an internal name to help you remember it.
- Snippet Type – set equal to JavaScript.
- Site Display – choose to display it sitewide or only on certain content.
- Exclude Pages / Posts – manually exclude certain content from having the snippet.
- Location – choose to add it in the header or footer.
- Device Display – only add the snippet for users with certain devices.
- Status – set to Active if you want to make this snippet live.
Below that, you can add your actual snippet into the Snippet / Code box.

When you’re finished, make sure to click the Save button at the bottom of the interface.
You can then repeat the process to add more JavaScript snippets as needed.
Summary
Adding JavaScript to WordPress opens up a lot of flexibility for your site. You can use it to add tracking scripts or integrate third-party services.
Or, you can add your own custom JavaScript (or hire a developer to help you do that).
For most WordPress users, using one of the WordPress JavaScript plugins is the best way to get started.
However, if you prefer the DIY approach, you can also manually add JavaScript using a child theme or a custom plugin.
If you want the ability to use these JavaScript plugins on your WordPress.com site, you’ll need to be on at least the WordPress.com Business plan so that you’re able to install your own custom plugins.
Sign up or upgrade today, and you can be adding JavaScript to WordPress in no time.
Want more tips? Get new post notifications emailed to you.
-

WordPress combatte l'attacco malware, 5 plugin infetti
Considerando che molti MSSP e MSP gestiscono siti WordPress per i propri clienti, la notizia di un’iniezione di malware in cinque plugin di WordPress solleva preoccupazione sulla vulnerabilità di questo comune software di creazione di contenuti di siti Web.
L'attacco alla catena di fornitura del software fornisce backdoor con codice dannoso che consente di creare account amministratori non autorizzati, con l'obiettivo di eseguire azioni arbitrarie, riporta The Hacker News. L'intrusione ha creato account amministratori dannosi con i nomi utente “Opzioni” e “PluginAuth”, consentendo l'esfiltrazione dei dettagli dell'account all'indirizzo IP 94.156.79[.]8.
Gli aggressori hanno anche effettuato iniezioni di codice JavaScript dannoso per infettare i siti Web presi di mira con spam di ottimizzazione dei motori di ricerca, RibelleIl ricercatore sulla sicurezza di Wordfence Chloe Chamberland ha scritto sul blog. Tutti i plugin interessati sono già stati rimossi dalla directory dei plugin di WordPress. Solo Social Warfare ha pubblicato una nuova versione che affronta la questione. Agli amministratori del sito web è stata consigliata anche la cancellazione immediata dei plugin.
Ora, oltre al malware, un nuovo skimmer per carte di credito “Caesar Cipher Skimmer” sta infettando diverse piattaforme di gestione dei contenuti, tra cui WordPress, Magento e OpenCart. Ben Martin Di Rapporti sicuri.
Risolvere il problema
I plugin in questione non sono più disponibili per il download dalla directory dei plugin di WordPress in attesa della revisione in corso. Wordfense offre a guida completa per pulire il tuo sito WordPress e associati cerotti.
Wordfense elenca i plugin infetti:
- Guerra sociale 4.4.6.4 – 4.4.7.1; Versione con patch: 4.4.7.3
- Widget di fiamma 2.2.5 – 2.5.2; Versione con patch: nessuna
- Elemento collegamento wrapper 1.0.2 – 1.0.3; Versione patchata. Sembra che qualcuno abbia rimosso il codice dannoso, tuttavia, l'ultima versione è contrassegnata come 1.0.0, che è inferiore rispetto alle versioni infette. Ciò significa che potrebbe essere difficile aggiornare alla versione più recente. Si consiglia di rimuovere il plug-in fino al rilascio di una versione correttamente contrassegnata.
- Modulo di contatto 7 Componente aggiuntivo multi-step 1.0.4 – 1.0.5; Versione con patch, nessuna
- Mostra semplicemente gli hook 1.2.1; Versione con patch, nessuna
Il team di Wordfence Threat Intelligence sta eseguendo un’analisi più approfondita e fornirà ulteriori informazioni non appena saranno disponibili.
“Stiamo lavorando attivamente su un set di firme malware per fornire il rilevamento di questi plugin compromessi”, ha affermato Chamberland. “Tuttavia, se si esegue una versione dannosa di uno dei plugin, si verrà avvisati dal Wordfence Vulnerability Scanner per verificare che hai una vulnerabilità sul tuo sito e dovresti aggiornare il plugin dove disponibile o rimuoverlo il prima possibile.”
Gli attacchi alla catena di fornitura aumentano del 633%
L'attacco Word Press porta alla luce nuove ricerche da Sonatype 9th Rapporto annuale sullo stato della catena di fornitura del softwareche ha scoperto un enorme aumento del 633% degli attacchi alla catena di fornitura del software.
-

La backdoor è entrata in più plugin di WordPress nel corso di un attacco alla catena di fornitura

I plugin di WordPress in esecuzione su ben 36.000 siti web sono stati sottoposti a backdoor in un attacco alla catena di fornitura con origini sconosciute, hanno detto lunedì i ricercatori di sicurezza.
Secondo i ricercatori della società di sicurezza Wordfence, finora sono cinque i plugin interessati dalla campagna attiva fino a lunedì mattina. segnalato. Nel corso della scorsa settimana, autori di minacce sconosciuti hanno aggiunto funzioni dannose agli aggiornamenti disponibili per i plugin su WordPress.org, il sito ufficiale del software CMS open source WordPress. Una volta installati, gli aggiornamenti creano automaticamente un account amministrativo controllato dagli aggressori che fornisce il pieno controllo sul sito compromesso. Gli aggiornamenti aggiungono anche contenuti progettati per ottenere risultati di ricerca vantaggiosi.
Avvelenare il pozzo
“Il codice dannoso iniettato non è molto sofisticato o fortemente offuscato e contiene commenti che lo rendono facile da seguire”, hanno scritto i ricercatori. “La prima iniezione sembra risalire al 21 giugno 2024 e l'autore della minaccia stava ancora aggiornando attivamente i plugin fino a 5 ore fa.”
I cinque plugin sono:
Negli ultimi dieci anni, gli attacchi alla catena di fornitura si sono evoluti in uno dei vettori più efficaci per l’installazione di malware. Avvelenando il software alla fonte, gli autori delle minacce possono infettare un gran numero di dispositivi quando gli utenti non fanno altro che eseguire un aggiornamento attendibile o un file di installazione. All'inizio di quest'anno, il disastro è stato evitato per un pelo dopo la scoperta di una backdoor inserita nella libreria di codici open source XZ Utils, ampiamente utilizzata da, in gran parte per fortunauna settimana o due prima della pubblicazione generale prevista. Esempi Di altro recente catena di fornitura attacchi abbondare.
I ricercatori stanno indagando ulteriormente sul malware e su come è diventato disponibile per il download nel canale dei plugin di WordPress. I rappresentanti di WordPress, BLAZE e Social Warfare non hanno risposto alle domande inviate via email. Non è stato possibile contattare i rappresentanti degli sviluppatori dei restanti tre plugin perché non hanno fornito informazioni di contatto sui loro siti.
I ricercatori di Wordfence hanno detto che la prima indicazione che hanno trovato dell'attacco risale a sabato questo post da un membro del team di revisione dei plugin di WordPress. I ricercatori hanno analizzato il file dannoso e hanno identificato altri quattro plugin infettati da un codice simile. I ricercatori hanno scritto inoltre:
In questa fase, sappiamo che il malware iniettato tenta di creare un nuovo account utente amministrativo e quindi invia tali dettagli al server controllato dall'aggressore. Inoltre, sembra che l'autore della minaccia abbia anche iniettato JavaScript dannoso nel piè di pagina dei siti Web che sembra aggiungere spam SEO in tutto il sito Web. Il codice dannoso iniettato non è molto sofisticato o fortemente offuscato e contiene commenti che lo rendono facile da seguire. La prima iniezione sembra risalire al 21 giugno 2024 e l'autore della minaccia stava ancora aggiornando attivamente i plugin fino a 5 ore fa. Al momento non sappiamo esattamente come l’autore della minaccia sia riuscito a infettare questi plugin.
Chiunque abbia installato uno di questi plugin dovrebbe disinstallarlo immediatamente e ispezionare attentamente il proprio sito per verificare la presenza di account amministratore creati di recente e contenuti dannosi o non autorizzati. I siti che utilizzano lo scanner delle vulnerabilità di Wordfence riceveranno un avviso se stanno eseguendo uno dei plugin.
Il post di Wordfence consiglia inoltre alle persone di controllare nei propri siti le connessioni dall'indirizzo IP 94.156.79.8 e gli account amministratore con i nomi utente Opzioni o PluginAuth.